|
Power Chords (Explained)
In this tutorial we will examine and study
the Power Chord. Learn how to play one, how to move from one to another, listen
to how it should sound, and how to build a power chord riff, we’ll learn the
golden rules, the do’s and the don’ts. And everything else you need to know.
A Power chord (mainly played in Rock and
Metal music) is relatively easy to position with your fingers compared to Barre
Chords and some open chords.
The difficult part about playing
this type of chord comes not with the actual positioning of the fingers and the
movement between chords, but with the techniques needed to create a Riff
The type of techniques I’m referring to are
things like string dampening, or Palm muting, rhythm structures, timing pushes
and lags, and lots of other stuff which we won’t get bogged down with all at
once, but will examine later on.
So lets get started…...
First of all lets listen to a power chord,
 to listen to demo 1 MP3 file.
This is the sound of a G5 power chord played
on a fender strat with overdrive.
Now we’ll find out how this is achieved.
Lets first of all look at a diagram of the
neck of the guitar.

Now lets look at which fingers
we’re going to use to play G5
We’ll refer to your fingers in
number and colour terms. As in the pic below…..
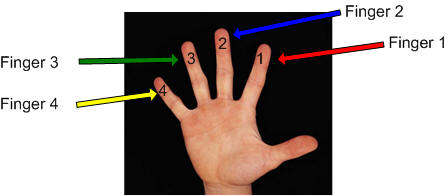
Finger 1 is Red, 2 is Blue, 3 is
Green, & 4 is Yellow. So for instance if you see a red dot on the neck use
finger 1, or a Green dot use finger 3. and so on,
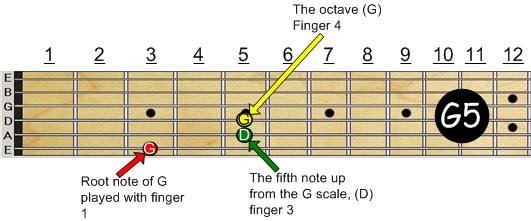
Here’s G5

Finger number 1's on fret 3 on
the E string, Finger number 3's on fret 5 on the A string, & Finger number 4's
on fret 5 on the D string,
If your familiar with the notes
on the fretboard you’ll know that…………………………...
Fret 3 on the E string is a G
note,
Fret 5 on the A string is a D
note, &
Fret 5 on the D string is a G
note also,
Here’s the notes on the fretboard
with the notes of the G5 chord ringed in Red,

So this is how to play G5, but
one power chord doesn’t make our riff.
We need to move on and learn more
power chords.
The important thing to understand
about "bare fifth" power chords is that they are governed by four basic
rules…………...and they are:
1. Individually they are neither
major or minor chords, and the reason for this is that they consist of just a
root a fifth and an octave note of the major/minor scales and lack the crucial
major 3rd or minor 3rd note which added to the root and
fifth note define a major or minor chord.
2. They take their shape from
playing the root note with finger 1 (or an open string), the fifth by playing
two frets up on the next string with finger 3, and the octave on the same fret
as finger 3 but on the next string up. With the exception of a chord formed from
the D string which takes its shape from playing the root note with finger 1 (or
an open string), the fifth by playing two frets up on the G string with finger
3, and the octave by playing three frets up on the G string with finger 3,
3. The root note of the chord is
taken from the chromatic scale i.e.: A A# B C C# D D# E F F# G G#, and is played
from the E A or D string, although when playing the power chord from the root on
the D string it takes on a slightly different shape as explained above and
featured later on in this tutorial.
4. The bare fifth power chord is
movable and always retains its format or shape i.e.:……..
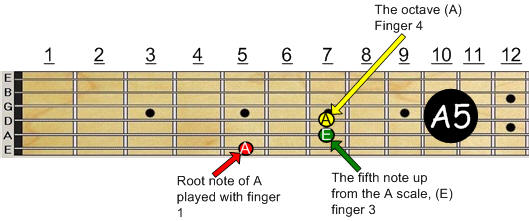
the important thing to understand
is that by keeping your fingers in the same shape formation you can move around
between power chords.
And you can do this either by
moving the chord shape up or down the neck, keeping the root note of the chord
on the same string,
Or by taking the shape and moving
it across to another string, i.e.: using either the E, A, or D string
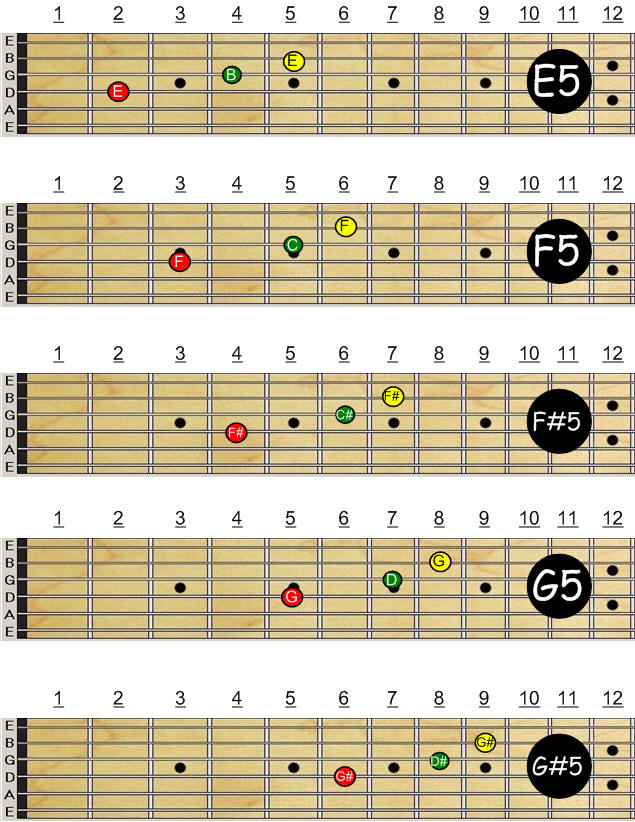
This is how power chords are
formed by taking the root note from the E string starting at the nut with the
open E as the root note.
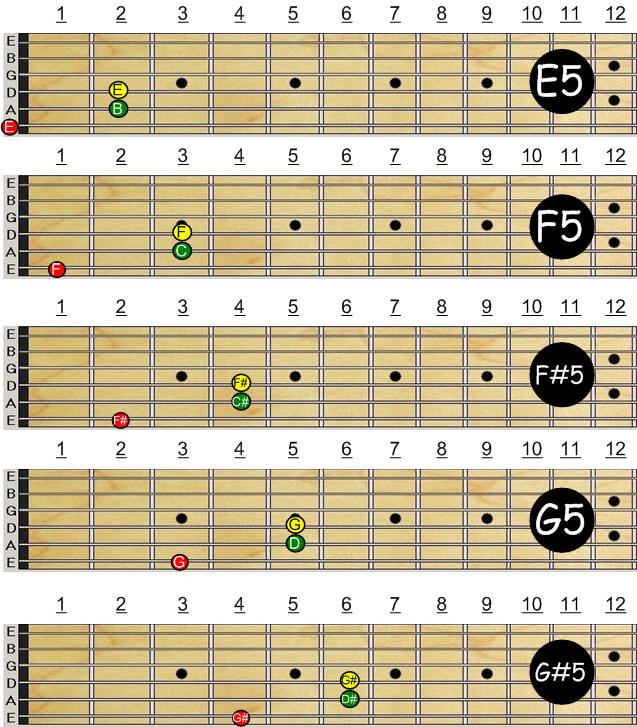
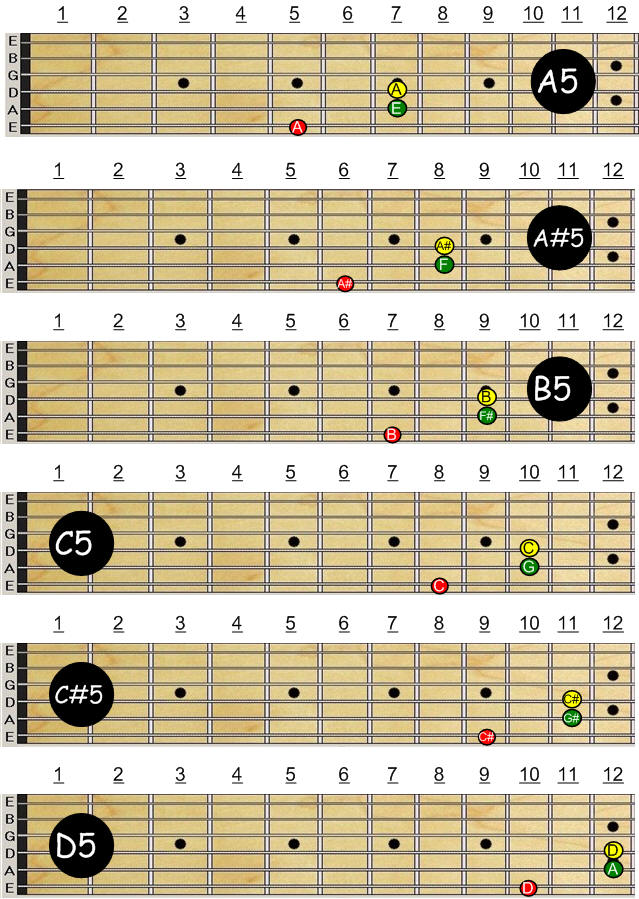
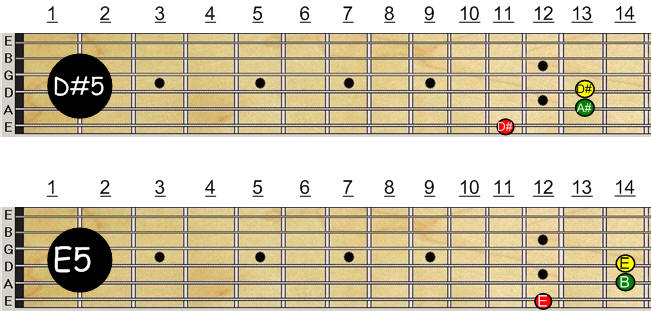
And ending at the 12th
fret with the note E as the root note, giving you another E5 chord, but this one
is an octave higher than the one at the nut.
This is because we have
progressed playing the chords through the whole musical chromatic scale on the E
string, in other words we started at E on the open string and went up the
fretboard one semitone (or one fret) at a time until we reached the E on the 12th
fret.
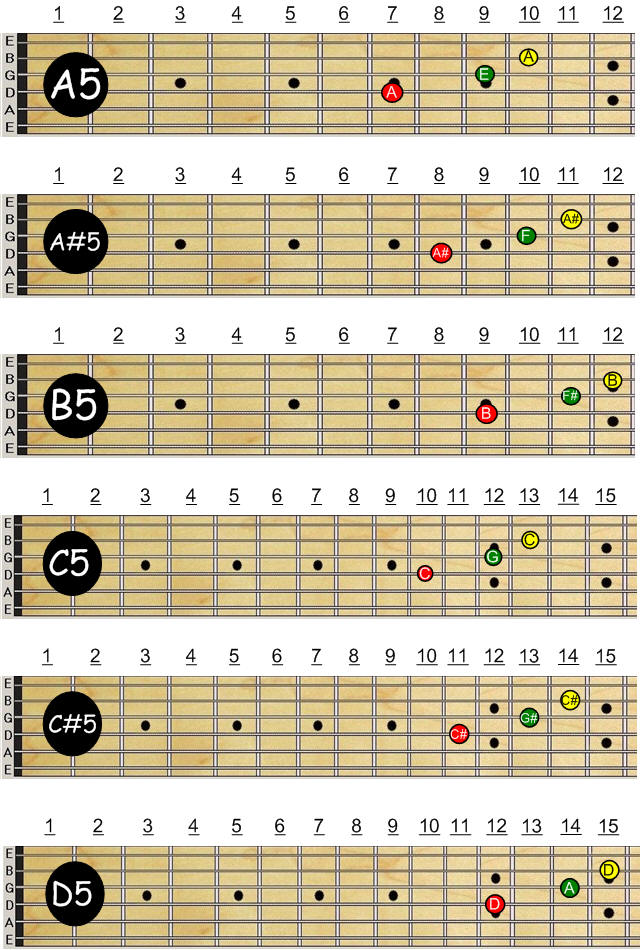
And in the same way we can do
this on the A string,
This is how power chords are
formed by taking the root note from the A string starting at the nut with the
open A as the root note, and progressing up one fret at a time through the
chromatic scale.
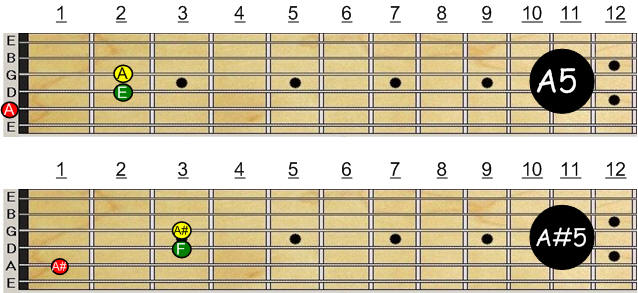
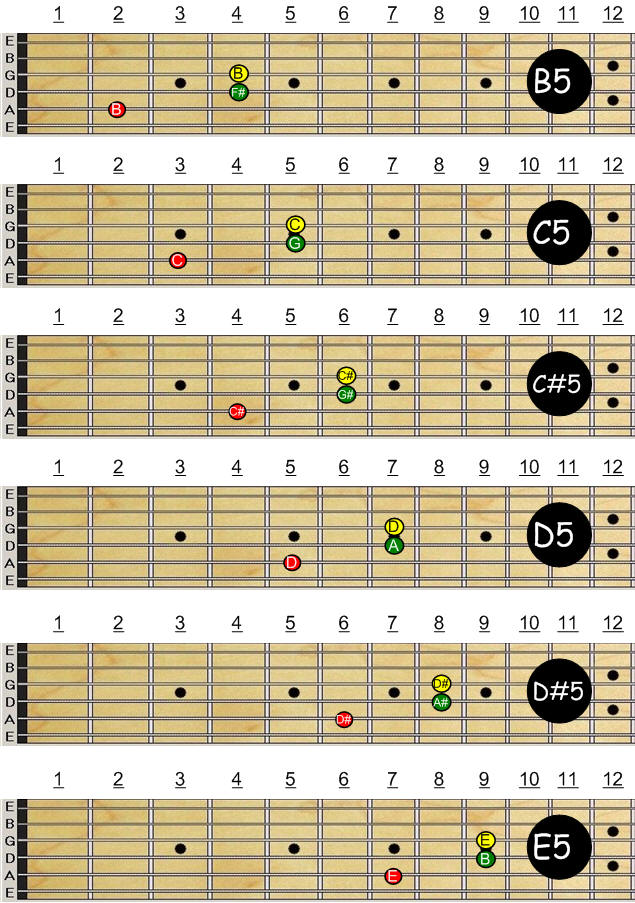

And ending at the 12th
fret with the note A as the root note, giving you another A5 chord, but this one
is an octave higher than the one at the nut.
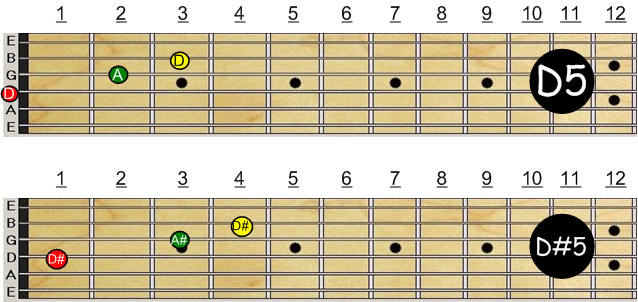
Power Chords can also be formed
from the D string.
But because of the nature of the
tuning on the 2nd or B string in relation to the E, A, and D,
strings, i.e.: it is tuned a semitone down from them, the chord takes on a
slightly different shape when formed and rooted on the D string, and the fourth
finger has to compensate for the tuning of the B string and move up to the next
fret.
The same three fingers are used,
but the chord is formed as in the diagram below,

starting at the nut with the open
D as the root note. We’ll work through the chromatic scale up to the 12th
fret.
So lets recap,
Power Chords are called Bare
fifth chords, they consist of three notes, the first, fifth, and octave of the
major or minor scale.
They can be played by taking the
root note from the E, A, or D string, and are defined by the chromatic scale,
and are labelled with the letter of the chord and the digit (5) i.e : A5 A#5 B5
C5 C#5 D5 D#5 E5 F5 F#5 G5 G#5 back to A5 and completing the chromatic scale of
the chord.
-------------------------------------------------------------------------------
Building a Riff, by movement and techniques with Power Chords
As I said in the first part of
this tutorial the finger positioning and formation of a power chord is
relatively easy, once you have mastered this and understand the notes and
positioning of chords on the fretboard, you can move on to learn how to use
power chords to create great rock and metal riffs, using palm muting & timing
techniques to inject rhythm, pace, and drive into your music,
There are many aspects to being
able to successfully play the guitar, in my opinion rhythm and timing are
probably the most important of all, and its important to play along with drums
and bass whenever possible, besides it makes learning more interesting to do
this.
Lets get started……………...
Lets first of all look at Guitar
Tablature, or Tab for short.
Guitar Tab is a method of writing
and reading instructions of what to play and how to play it on your Guitar,
Its an alternative to sheet
music, and is quite easy to understand once you get to know how it works and
learn the various symbols it uses.
We’ll use Tab as well as
fretboard diagrams to learn our riff.
Lets find out how it
works………………...
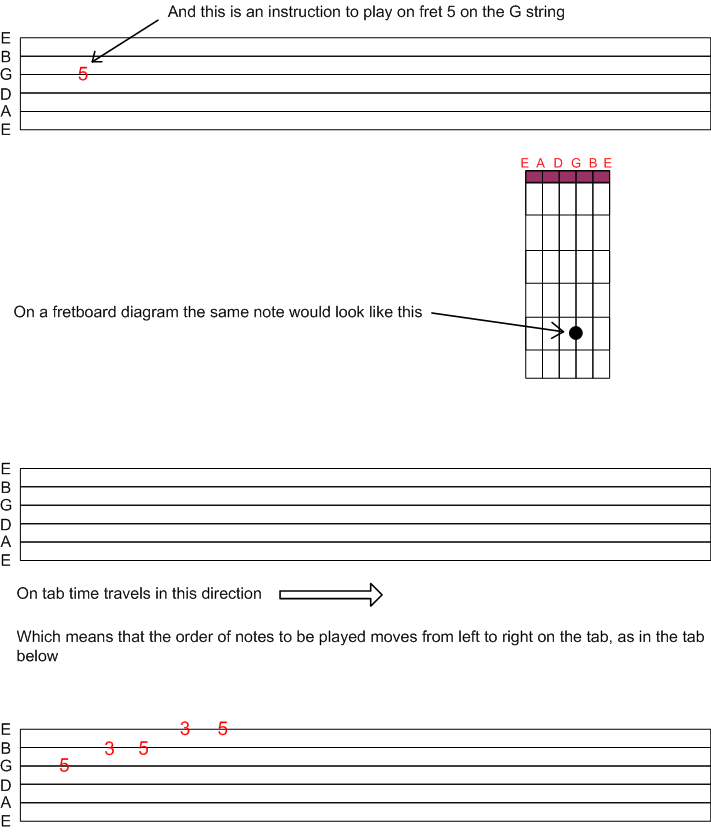
Tab looks like this…..

The lines above represent the
strings on your guitar.
As you can see they’re labelled E
A D G B E in the same way your guitar is tuned.
Its like looking at your guitar
on its side but without the frets drawn in.

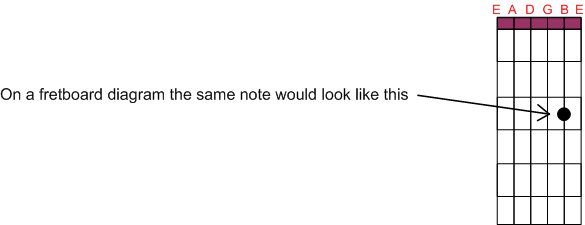
The
0
positioned on the B string in this tab diagram is instructing you
to play the B string open, or in other words play the B string without pressing
a finger on a fret position.

If a chord, or a power chord is
to be played or a situation where more than one note is to be played at once,
the tab will look like this.

If you recognise this as a G5
power chord you’re starting to understand tab.
And the tab below would be D5

An important point to remember
when reading a chord from tab is, only play what the tab tells you to play, when
a string is left empty it doesn’t mean play it open, in the tab above you just
play the three notes, ie: the 5th fret on the A string, the 7th
on the D, and the 7th on the G string.
Lets move on……………………..

to Listen to demo 2 MP3 file.
This is a D5 power chord played
over a four count.
In other words this is 1 bar (or
4 beats) of a D5 chord. Played in four four time.
And because it lasts for a full
bar (4 beats) its duration is the length of a whole note
The symbol for a chord lasting
for a bar or (4 beats) is 

So on tab demo 2 MP3 would look
as above
 to listen demo3 MP3 file. to listen demo3 MP3 file.
This is D5 played on each of the
4 beats of the bar, lasting one beat per chord.
Which means each chord lasts a
quarter of a bar, or a quarter note duration.
The symbol for a chord lasting
for 1 beat or a quarter note duration is 

So on tab demo 3 MP3 would look
as above
 to listen to demo 4 MP3 file. to listen to demo 4 MP3 file.
This is D5 played eight times
over the course of a bar, or twice to every beat
Which means each chord lasts an
eighth of a bar, or a eighth note duration.
The symbol for a chord being
played 2 times per beat or an eighth note duration is

So on tab demo 3 MP3 would look
as above
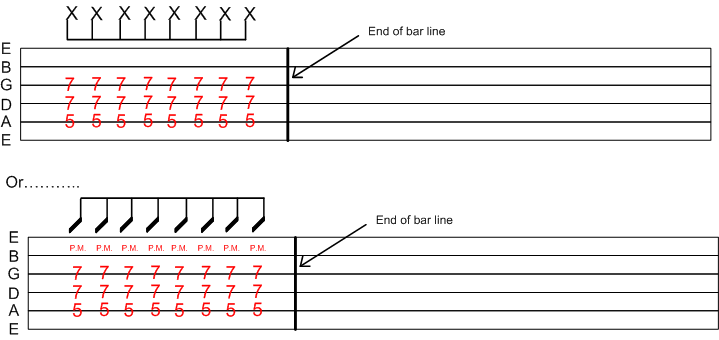
In track 4 the chords are played
with a dampening technique added, this is known as Palm muting, which we will
now look at,
This would be shown on tab by the
initials P.M. written above each note or chord.
Or sometimes a symbol
 would be used.
Instead of the normal would be used.
Instead of the normal
 symbol. symbol.
Which would make Track 4 look as
follows………………………..
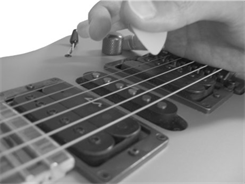
Dampening the strings, or Palm
muting is achieved by using the outside of your picking hand and resting it
lightly on the edge of the bridge, as shown below,
Try playing a D5 chord with your
hand resting in this way,
If you get a sound like in
 of the MP3 Demo’s then you are holding your hand either to far out onto the
strings from the bridge, or applying too much pressure.
Palm muting is quite tricky and
sometimes takes a lot of practice to achieve.
The object of the exercise is not
to completely stop the chord working. You need to retain the pitch and
colour of the chord, but just stop it sustaining, this gives the chord
definition when played in a rhythm pattern, like the one in

A good way of starting is to rest
your hand 2 or 3 inches out from the bridge, and play a chord in a rhythm
pattern, and as you do this slowly move your hand back towards the bridge, this
is demonstrated in

-----------------------------------------------------------------------------------------------------------------------
Lets go on to the cool
part…………………...
Lets build a riff………….
Firstly we need to choose some
chords
Click here to listen to
 , ,
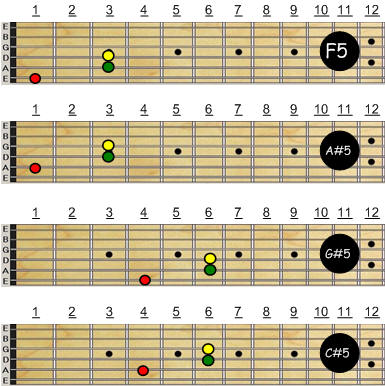
Here we have four power chords
just played one after another in this order, F5, A#5, G#5, & C#5
Add a click track to it and you
get

On tab it looks like this,

Add some Drums and Bass and it
sounds like

Use Rhythm & Palm Muting in your
playing and it sounds like

On tab it looks like this,

Palm Muting can be accented,
Meaning you can mute and release
the strings to form different rhythm patterns, and add pushes and accents to the
riff.
Click here to listen to

And by using a different plectrum
technique and a more diverse rhythm pattern you achieve a style like

 is 60 Bars of the bass & drums
at 120 bpm, which is for you to use to practice the riff which have been working
with. is 60 Bars of the bass & drums
at 120 bpm, which is for you to use to practice the riff which have been working
with.
Over the past few pages of this
Chapter of the E book we have taken things one step at a time regarding power
chords and riffs and how they are shown on tab,
When starting to learn to play
the guitar as a beginner its important not to try and rush things too much.
In one on one lessons which I
give at my studio, my students achieve great results by using this approach.
This tutorial on power chords is
just one of a series of chapter’s on learning to play the guitar.
Contact me for details at
chrissummers6@hotmail.co.uk
I hope this tutorial has been
helpful, comments and views are welcome, please email the above
END
To Download & Print this Lesson + a complete lesson on Barre
(Bar Chords).
go to


| 